Ronstan ARS rod systems are available with a range of surface finish options to suit the project aesthetics, installation location, environmental corrosion criteria and available budget requirements. Considering these parameters and drawing on our many years of field experience, Ronstan can assist you select an appropriate finish to ensure the product performs adequately over the course of the products intended life.
The following surface finishes are offered as standard options.
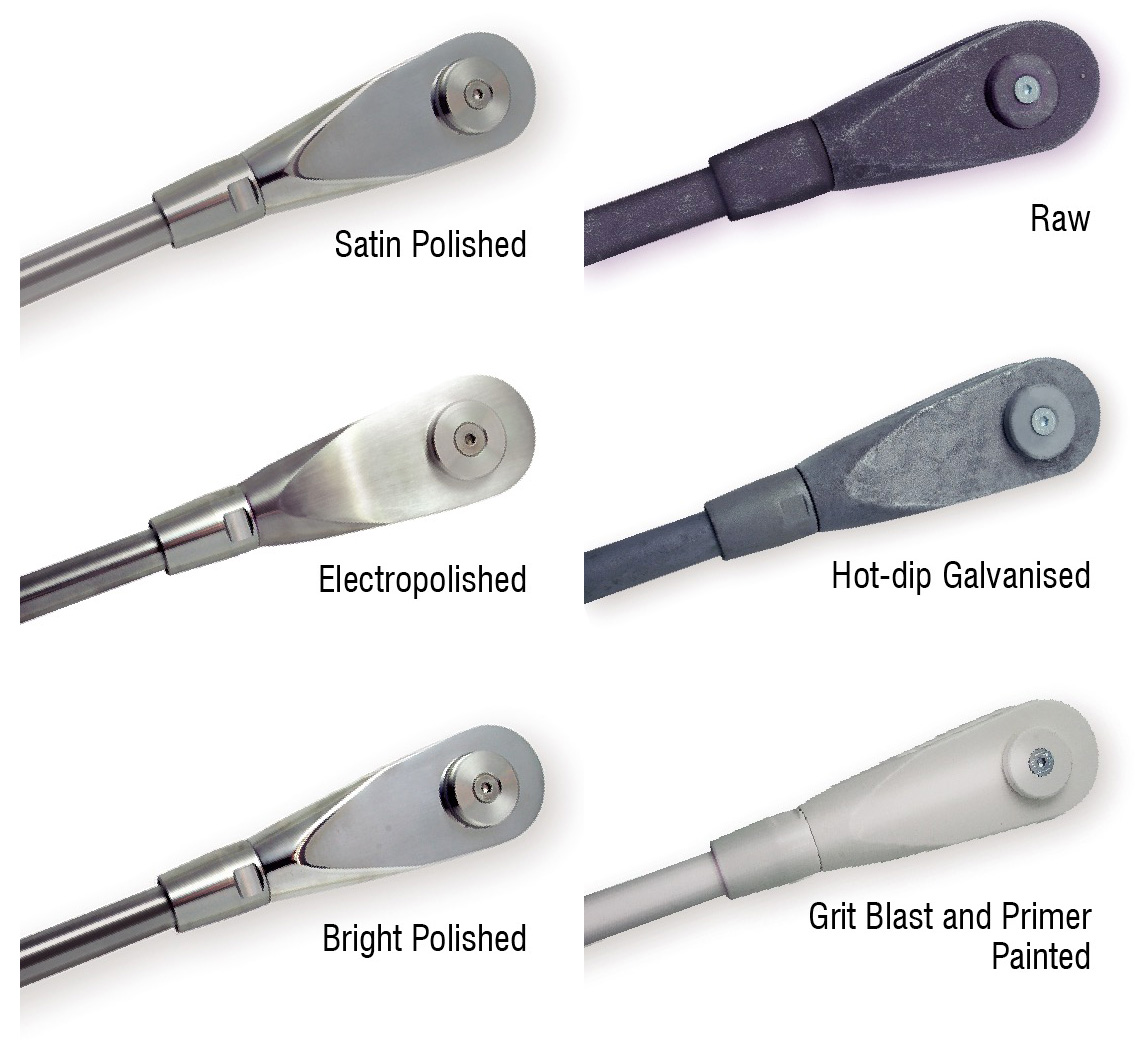
SS – Stainless Steel Rod Finishes
Satin Polished #4 (240 grit)
A grainy, matt finish. Often used in architectural applications for its unobtrusive & minimalist appearance. Better suited to internal non-corrosive environments.
Electropolished
The most cost effective stainless steel finish, providing a high level of corrosion protection and light aesthetics. Note; this process may sometimes produce an uneven ‘frosting’ appearance due to surface reaction with the chemical process. It may also highlight marks or imperfections in the raw material surface. A selective electro chemical metal removal process (exactly the reverse of plating). The process results in the simultaneous smoothing, levelling and brightening of stainless steel. It selectively removes surface flaws, embedded impurities and high points in the surface layer.
Bright Polished #7 with Passivation
The smoothest, shiniest finish providing an improved level of corrosion protection. Bars are mechanically polished then passivated. Passivation is a chemical treatment applied to the surface of the stainless steel to remove contaminants and assist in the formulation of a continuous chromium-oxide passive film. (Note-ARS2 passivation is not standard).
CS – Carbon Steel Rod Finishes
Raw
Raw carbon steel as drawn or cast (sometimes referred to as “black” or “self colour”). The lowest cost surface but will require a secondary coating to prevent oxidisation and corrosion staining from forming. Note; raw carbon steel rods and components placed in storage or transport may suffer surface corrosion as a result of the environment they are subjected to.
Hot-Dip Galvanised
The most cost effective finish for carbon steel tendons providing well proven performance to BS EN ISO1461:2009.
Grit Blast and Prime Painted
A typical finish requirement for carbon steel items before receiving a final colour top coating. The grit blasting is done to remove surface impurities and provides a clean surface for a metal primer paint to key to. Note; painted surfaces may be affected/damaged by transport and handling.
Other surface finishes for the stainless steel or carbon steel rod systems are available on request.
Contact Ronstan to discuss your requirements.
How to Dimension Your Rods for Manufacture
Figure 1 shows a typical Ronstan rod system broken down into its parts. All length dimensions for rod production are taken from centre-of-pin to centre-of-pin. Thread setting – Unless otherwise requested rod systems are manufactured at mid-adjustment. This means we manufacture the rod to the dimension provided with 1/2 of the thread already taken up within each fork (and turnbuckle if used). This ensures adjustment can be either taken up or let out. Joiners or turnbuckles will be equispaced along the assembly length, unless specified otherwise.
Other thread positions or end types available, (eg: hexnut) on request.
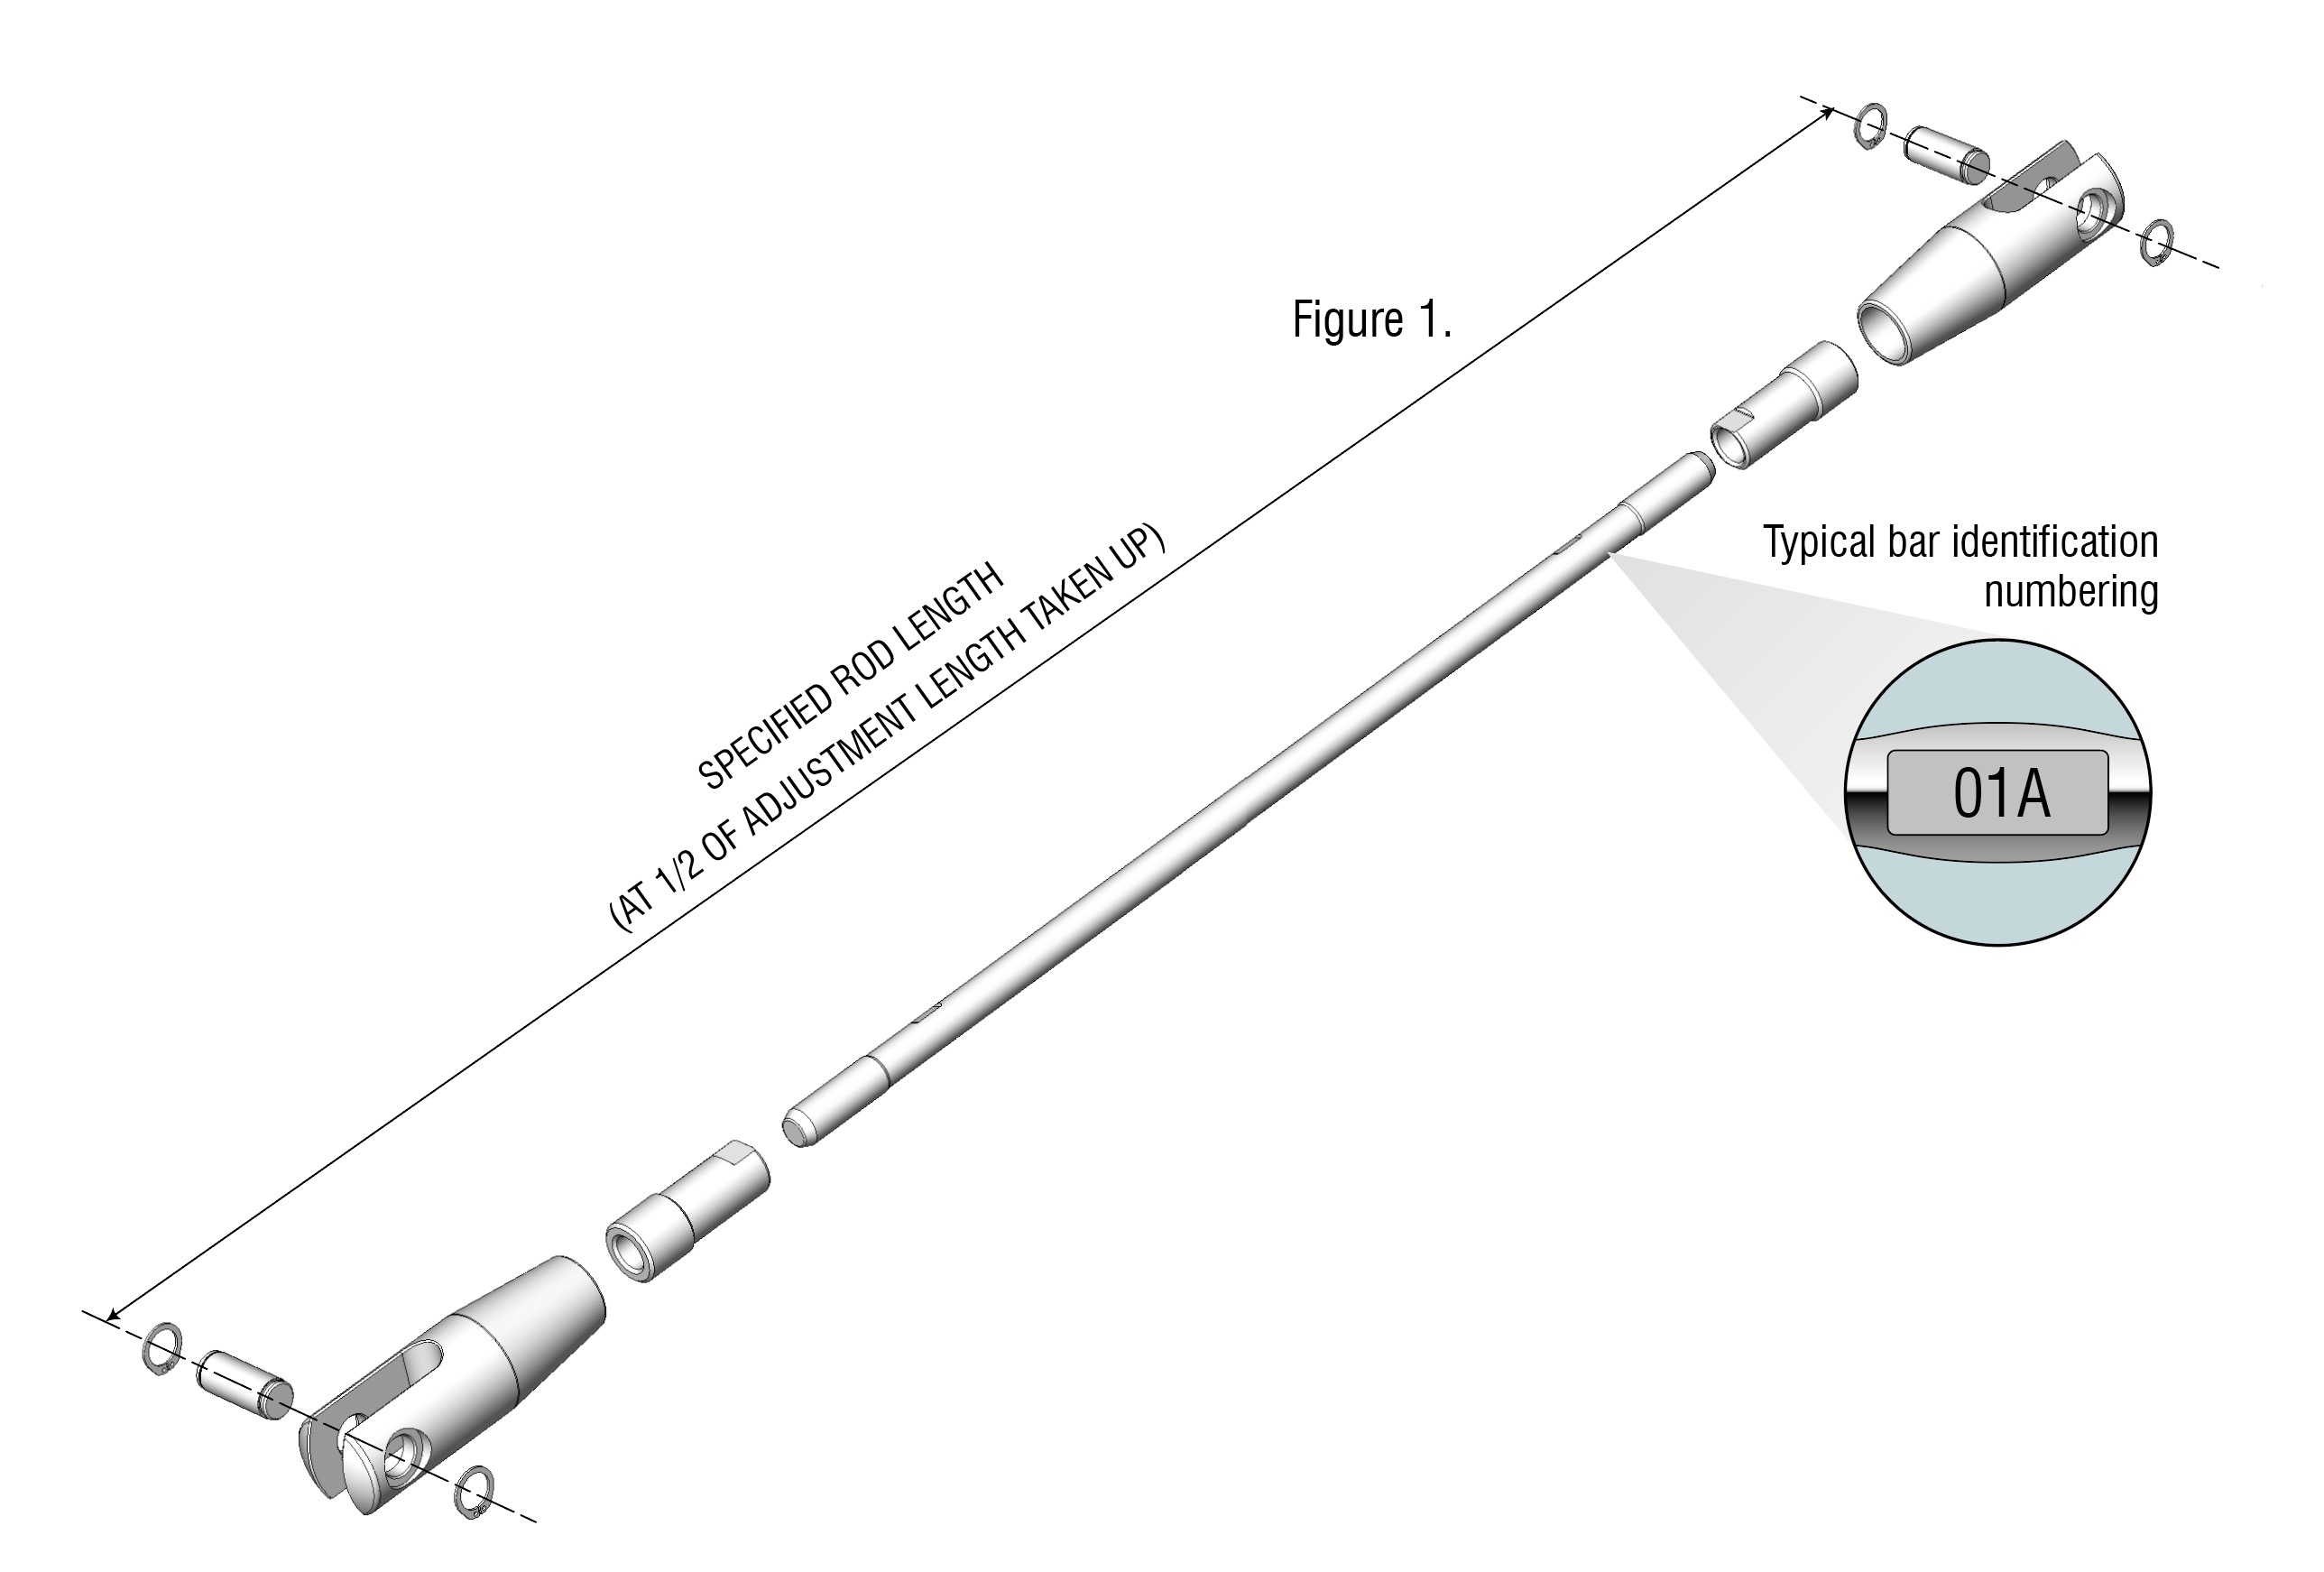
Rod identification number stamping is available for ARS1 & ARS3 and will be placed on the spanner flat of the rod. This is helpful for projects with a large number of rods of similar but critically different lengths. A stamp can assist in easy identification on-site for efficient installation. Please notify Ronstan at the time of order and provide details of any special stamping requirements or schedules.
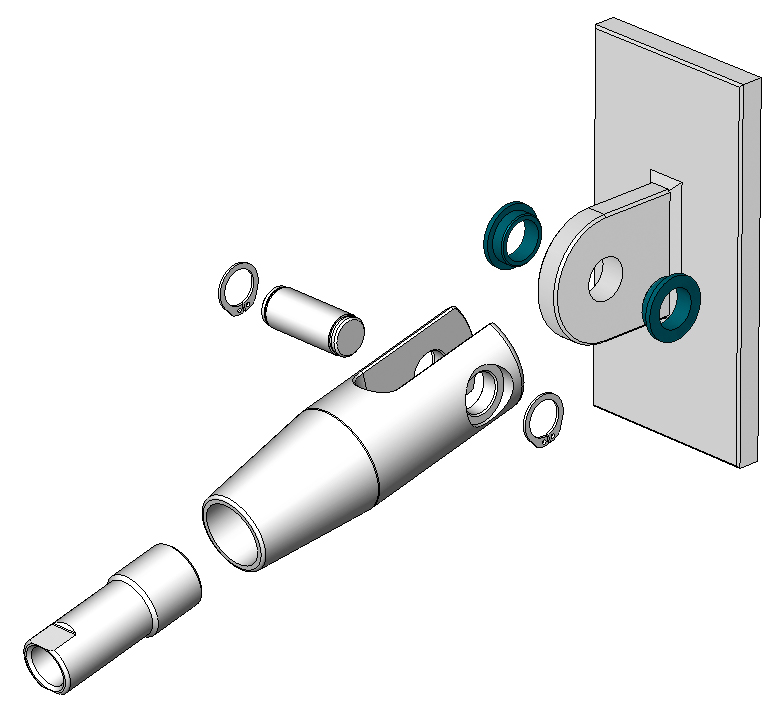
Isolation Systems for Dissimilar Metals
Installations that combine dissimilar metals (eg: stainless steel rods connecting to a carbon steel structure) may be subject to galvanic corrosion and require isolation systems to prevent damage to the rods and structure. Ronstan can provide isolation systems to suit typical installations. These are custom made to suit the installation.
End Connection Requirements
Ronstan threaded rod systems are suitable for a wide range of applications. However, like all properly engineered mechanical systems these products require certain basic structural engineering principles to be followed to ensure proper functionality.
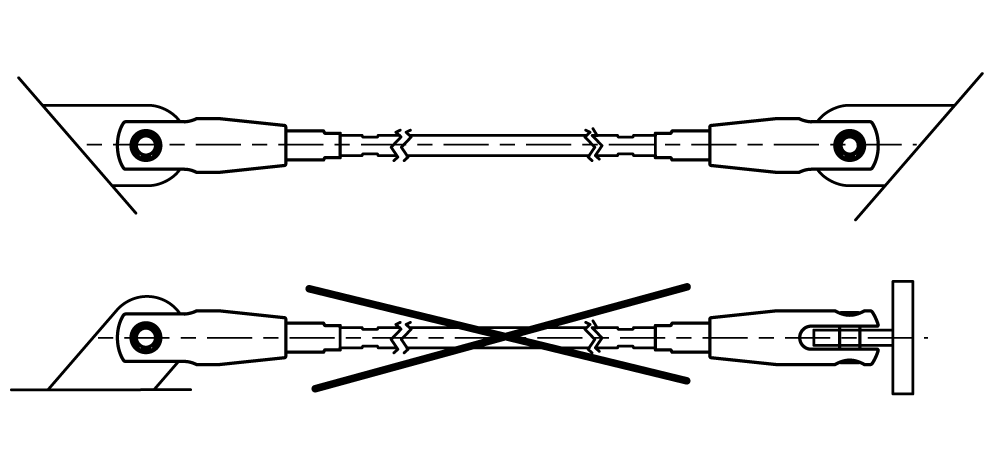
Fork pin orientation is to be such that both clevis pins are in the same plane. Eg, total system orientation should permit the rod assembly to pivot at both ends and follow natural movement within the connected structure, to avoid bending or restriction.
±0.5° max angular offset from neutral plane

Rod assembly end connection alignment is required to be within +/- 0.5° from the neutral axis. Eg. the tendon assembly should connect structure and avoid bending of the pin, tang/cleat or clevis jaw & the resulting restriction of movement.
Tensioning/Length Adjustment
Ronstan ARS1A is tensioned by rotating the spanner flat on the adjuster while using a second spanner to hold the rod still. This can be done at one or both ends. Tensioning of the rod from one end (using one person) saves time, installation costs, and often the need to tension at height if the rods are elevated.
Ronstan ARS2, ARS3 & ARS4 are tensioned by rotating the rod only, via the spanner flats on the rod or turnbuckle. Once the required length/tension is achieved, the tapered lock nuts should be screwed down onto the fork/turnbuckle ends and firmly tensioned. ARS6 is tensioned by rotating the center tube, then locked by a grub screw at one end.
ARS2 & ARS4 systems can utilize Ronstan’s pre-stressing equipment.
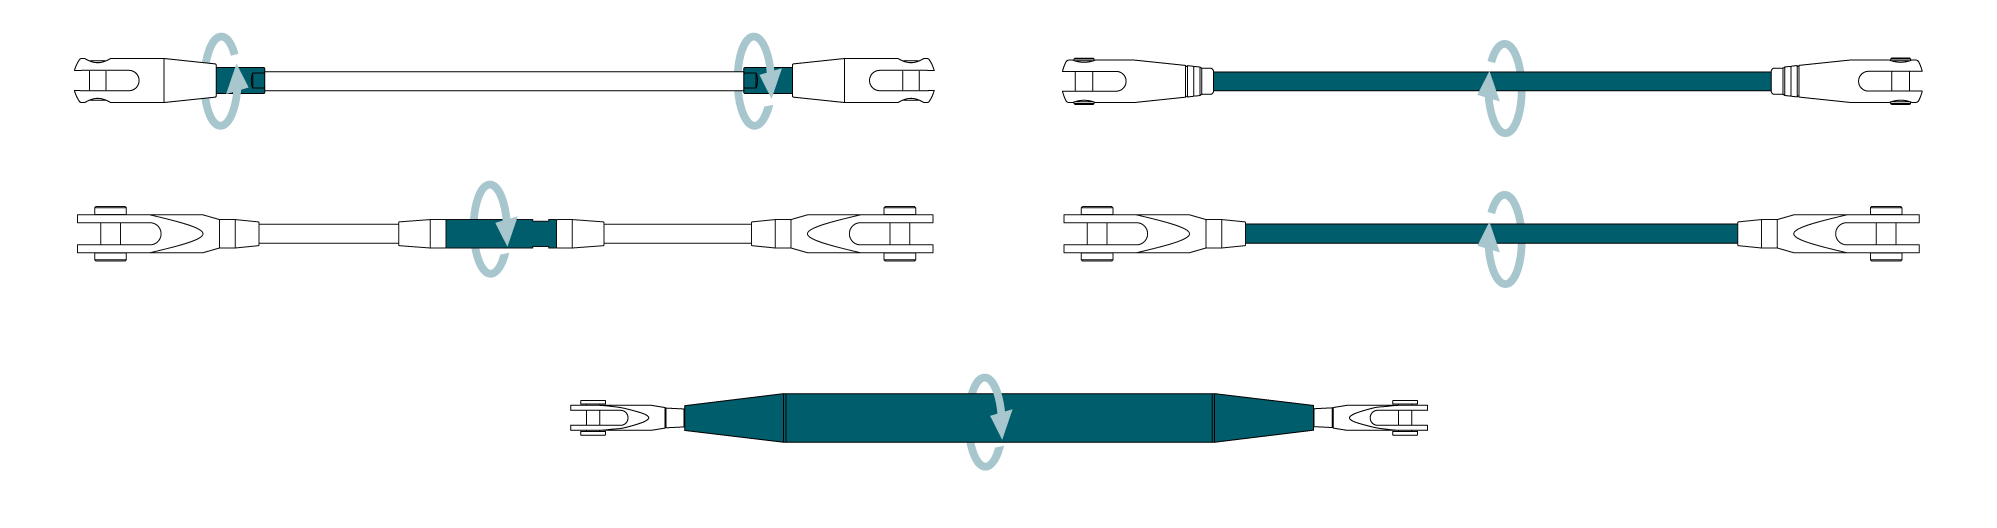
ARS6 Adjustment range – All compression struts are supplied fully assembled and set to the nominal pin-pin length. The installed strut can be adjusted to length by +/- 50 mm.
| To install & adjust, follow the steps below: |
| 1. Slacken off the locking grub screw in each LH & RH cone end |
| 2. Install the compression strut and pins |
| 3. Adjust compression strut length by rotating the tube if necessary |
| 4. Tighten locking grub screw |


